How to change the interface language of MS Office
As education starts by learning alphabet, we also start
learning computer, holding the hand of MS office softwares. Most of the users
in the world have this software in their computer. Such a person who does not
use these softwares are very rare.
MS office is packed with MS word (word processing software to
write document), Excel ( spreadsheet software for accounting), Powerpoint (
presentation software), Access ( database software), Publisher ( web designing
software), Outlook (sending and receiving email software), Onenote ( personal
notes and screenshot making software) etc. All these softwares are very useful.
So if we get the interface language of these softwares in our
mother tongue or vernacular language we can get a clear concept to understand
all the options and we can work easily in MS Office programs.
Let’s see how to change the interface language of all the
programs of MS Office.
Methods: To change the interface language you need to follow
these three steps-
i) To
download the Language Interface Pack of MS Office.
ii) Installation
of LIP.
iii) To
change the required options.
Step- i) To download the Language Interface Pack of MS
Office:
You have to download a language interface pack for your
preferred language according to MS Office version (MS Office 2007, 2010, 2013
or previous versions).
Click here to go to MS Office Language Interface Pack page.
When you click on the button (MS Office 2007, 2010, 2013) you
will be redirected to a new page. Download the MS Office Language Interface
Pack file and also the MS Office LIP Help file. MS Office LIP Help file will
help you to be acquainted with the terms and menu names in your language. In
this file you can also learn some procedures of making a document.
Step-ii) Installation of MS Office LIP:
Install the MS Office LIP file by clicking twice on it.
Step- iii) Change the required Options:
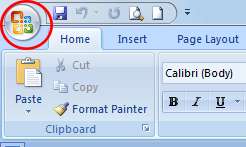
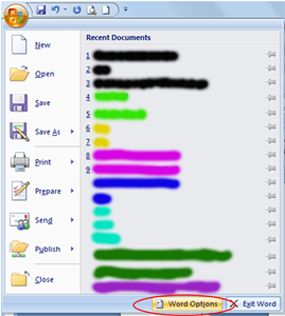
1. Open MS WORD.
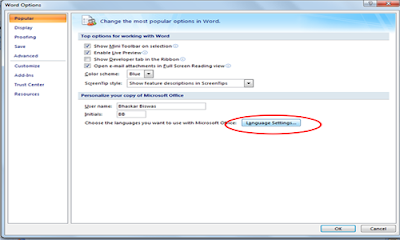
5. In “Display Microsoft Office menus
and dialog boxes in” choose your installed language from dropdown menu. Then
click Ok.
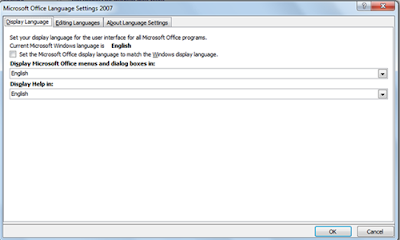 |
| Microsoft Office Language Setting Dialog Box |
The change will be effective after
you close all the programs of MS Office programs and restart MS Office
programs.
You can also change the language into
English by following the step (No- iii).
How to change the interface language of Windows
Each and everyone loves his mother tongue. We can easily express ourselves in our mother tongue. We comprehend something better expressed in our vernacular language than any other language which we learn. How amazing it will be if we see our computer interface language in our mother tongue or vernacular language. Let’s learn how we can change the interface language of Windows Operating System in our computer.
Necessary Steps:
First, you need to download a Language Interface Pack (LIP).
Install your downloaded LIP.
You have to change and set some options.
Step- 1: Download a Language Interface Pack
You need to download a LIP for your language according to the version (Windows 7, Windows 8/ Windows RT, Windows Vista, Windows XP) and system type (32 bit or 64 bit) of your Windows Operating System.
If you do not know the version and system type of your Windows Operating System go to Computer and click on System Properties.
Click here to go to Windows Language Interface Pack page.
At this page select your operating system from upper right corner and then click your preferable language from the bellow. Now you will be redirected to a new page and download your language according to system type ( 32 bit or 64 bit).
Step- 2: Installation of LIP
Just click double on the LIP file and follow the instructions. It will be installed.
Step- 3: Set the options
Go to Control Panel ( To go to Control Panel click Start button > Control Panel ). Then click on Clock, Language and Region.
Then click on Change keyboards or other input methods.
Region and Language box will appear. There is a Keyboard and Languages tab. In Display language section select your downloaded language. Then click Ok button.
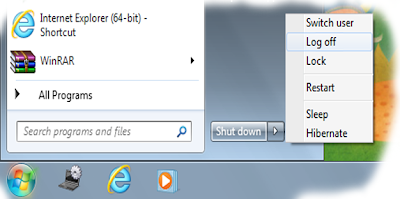
Now you have to log off your computer. Just click on Start button. Then click on the arrow button beside the Shut Down button and click Log Off. Your computer will be logged off and finally your computer will display your preferable vernacular language. Isn’t it amazing?
The words which are not translated in your language will appear in English language. If you want to change the language into English, you have to uninstall your language. As you have the downloaded file in your computer it can be installed and displayed later, following the above steps.
If you want to uninstall your downloaded language go to Control Panel > Clock, Language and Region > Change keyboards or other input methods. In Region and Language dialogue box there is a Keyboards and Language tab. In Display section click on Install/Uninstall Language. And finally restart your computer.
Text to Shape Animation
Today I will show you how to use tween effect for an animation. In the next post I will show how a picture is shown through a shape.
Select Text Tool.
Write a word. Select the word. Click Right button and click on Break Apart and again click Right button and click on Break Apart. Break Apart is done twice.
Select frame no 30. Click right button and click on Insert Blank Keyframe.
Go to Rectangle Tool. Click and hold the mouse button. Select Polystar Tool.
Go to Properties Window bellow. Click on Options. A dialogue box named Tool Settings will appear. Choose Star from Style. Set the number of sides 10. Then click Ok.
Choose a color from Fill Color. Then draw the big shapes with different colors. You may choose Gradient color to make a beautiful shape.
Now select some frames within two keyframes. Go to Properties window. Click on Tween’s drop-down box and select Shape.
Now save the project. File > Save > Give a name > Ok.
Now press Ctrl (control) and Enter keys together to play the animation.
Select Text Tool.
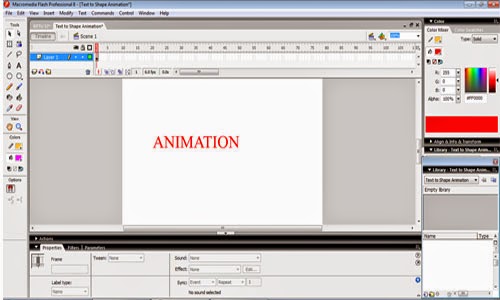 |
| Write the Text |
Write a word. Select the word. Click Right button and click on Break Apart and again click Right button and click on Break Apart. Break Apart is done twice.
Select frame no 30. Click right button and click on Insert Blank Keyframe.
 |
| Rectangle Tool |
Go to Rectangle Tool. Click and hold the mouse button. Select Polystar Tool.
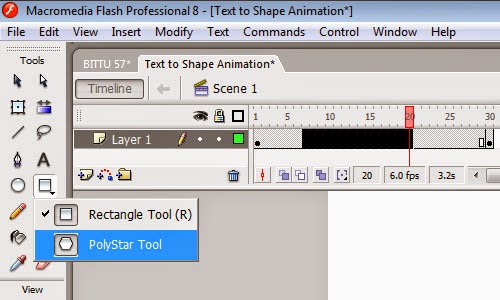 |
| Polystar Tool |
 |
| Plolystar Options |
Go to Properties Window bellow. Click on Options. A dialogue box named Tool Settings will appear. Choose Star from Style. Set the number of sides 10. Then click Ok.
 |
| Gradient Color Selection for the Shape |
Choose a color from Fill Color. Then draw the big shapes with different colors. You may choose Gradient color to make a beautiful shape.
 |
| Beautiful Shapes |
Now select some frames within two keyframes. Go to Properties window. Click on Tween’s drop-down box and select Shape.
 |
| Tween |
Now save the project. File > Save > Give a name > Ok.
Now press Ctrl (control) and Enter keys together to play the animation.
Rain and Thunder – flash animation
This lesson will guide you to easily learn an animation of rain and thunder. We will proceed through a number of steps so that we can make our task into small parts. Adobe Flash CS6 and Macromedia Flash 8 Pro are mainly the same type of application of different software corporation.
We can make attractive flash animations through macromedia flash 8 pro. Just we need to apply our common sense. To develop our artistic sense we should see our surroundings and watch what happens around us.
However we are now going to our task. First open macromedia flash 8.
We can make attractive flash animations through macromedia flash 8 pro. Just we need to apply our common sense. To develop our artistic sense we should see our surroundings and watch what happens around us.
However we are now going to our task. First open macromedia flash 8.
Step 1. Click on flash document. (To see the screenshot go to the previous post)
The stage will appear now. Draw a picture.
You can also import any picture from your document. Click on File menu > Import > Import to stage and then select a picture to insert on the stage. Then click Ok.
You can also import any picture from your document. Click on File menu > Import > Import to stage and then select a picture to insert on the stage. Then click Ok.
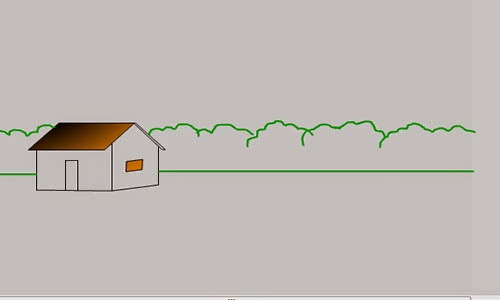 |
| Picture of a House |
Step 2. Click on the layer button to create a new layer (or Click Insert menu > Timeline > Layer).
 |
| Insert a New layer |
 |
| Insert a Keyframe to the Layer |
Select the Line tool from the tool box. Then draw a little line diagonally at top of the stage to indicate the rain drop. Click on the frame no 25 and click right button and select the Insert Keyframe (or press F6). Select some frames between the two keyframes. Click right button and click on Create Motion Tween. Select the last keyframe (frame no 30) and now place the line drawing at the bottom of the stage.
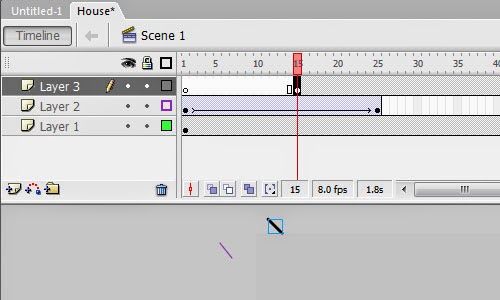 |
| Again Create a New Layer and insert a keyframe (15) |
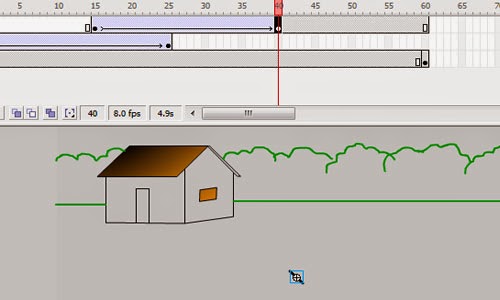 |
| Insert e keyframe (40) to the Layer |
Again create a new layer and select frame no 15 and insert a keyframe and draw a line diagonally. Then select frame no 40 and click right button and select Insert keyframe. Select some frames between two keyframes and click right button and select Create Motion Tween. Now select the last keyframe (frame no 40) and then move the line at the bottom.
 |
| Properties Window |
Then click on the Selection Tool and click on the shape. Now from the Properties window bellow select the color and choose the Alpha option. Set the alpha 25%.
Again create new layer and insert a keyframe after a few frames so that the rain falls after some time one by one. Follow Step – 2 to create new layers for rain drops.
Again create new layer and insert a keyframe after a few frames so that the rain falls after some time one by one. Follow Step – 2 to create new layers for rain drops.
 |
| Rain drop Layer |
Step – 3. Select the layer no 2 and create a new layer. Select the frame no 25 i.e. where the rain drop ends in the previous frame and insert a keyframe. As a result when the rain drops on the ground the oval will appear.
 |
| Draw oval |
Select the Oval tool and draw a oval.
Now select a frame (frame no 40) and insert keyframe. Select some frames between the keyframes and create motion tween.
Now select a frame (frame no 40) and insert keyframe. Select some frames between the keyframes and create motion tween.
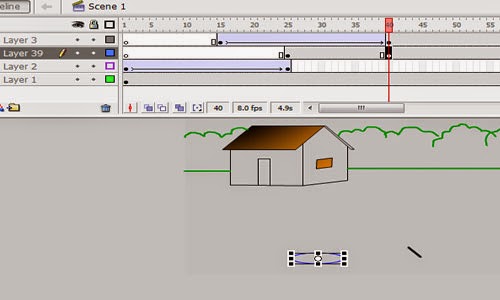 |
| Enlarge the Oval |
Now select the last keyframe and enlarge the oval a little bit. To enlarge the oval select the Free Transform tool and click on the shape and then click and drag the mouse pointer. Then click on the Selection Tool and click on the shape.
Now from the Properties window bellow select the color and choose the Alpha option. Set the alpha 25%.
Again select a layer in which rain has been drawn and create a new layer above this layer and select and insert a keyframe where the rain drop ends in the previous layer. Do the same as earlier.
Now from the Properties window bellow select the color and choose the Alpha option. Set the alpha 25%.
Again select a layer in which rain has been drawn and create a new layer above this layer and select and insert a keyframe where the rain drop ends in the previous layer. Do the same as earlier.
 |
| Stroke Color and Fill Color |
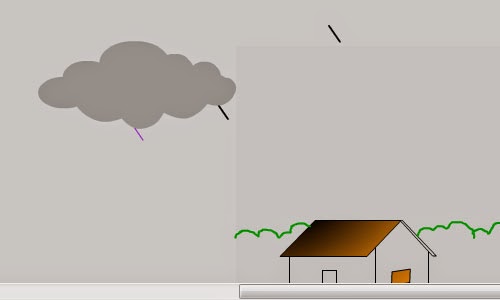 |
| Draw Cloud |
Step 4. Create a new layer. Select Oval tool from Tool Box to draw a cloud. Click on the ‘stroke color’ and select ‘no color’. From Fill Color select a cloud like color. Now draw the cloud.
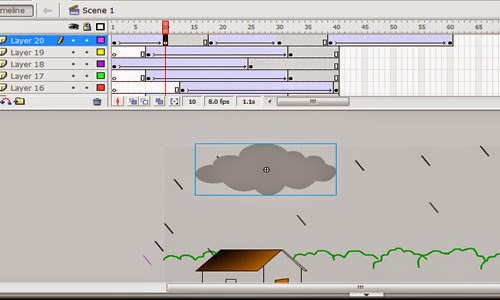 |
| Insert a keyframe (10) and Create Motion Tween |
Select the frame no 10 and insert keyframe. Select some frames between the keyframes and create motion tween. Select the last keyframe and move the cloud inside the stage.
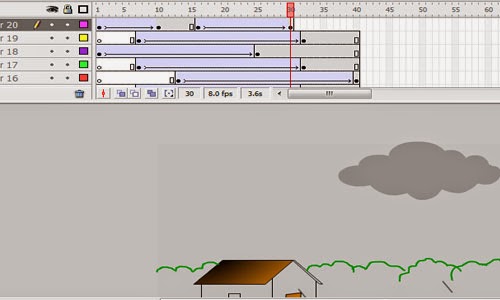 |
| Insert Keyframe (16 and 30) and Create motion tween |
Select the frame no 16 and insert a keyframe. Select frame no 30 and insert keyframe. Select frames between 16 and 30 and create motion tween.
Select frame no 36 and insert a keyframe and select frame no 50 to insert the keyframe. Now select frames between 36 and 50 and create motion tween.
Select frame no 36 and insert a keyframe and select frame no 50 to insert the keyframe. Now select frames between 36 and 50 and create motion tween.
Step – 5. Create a new layer. This layer is for thunder. Rename this layer Thunder (double click on the layer name).
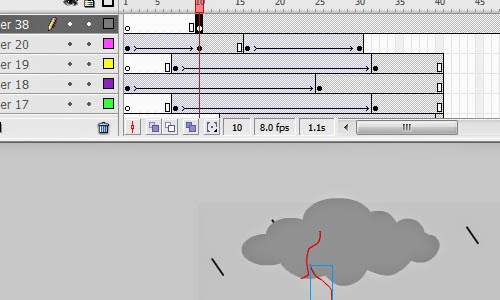 |
| Draw thunder |
Insert a keyframe on frame no 10. Now select Pencil Tool and draw a thunder-like curve a little. In the next frame insert a keyframe again and draw the curve more. Again insert the keyframe and draw the curve. Draw this curve within four frames.
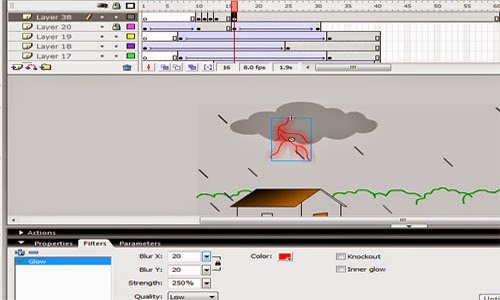 |
| Make a movie clip and Give effect |
Insert a keyframe (frame no 16) after three frames. Take the Selection Tool and select the thunder. Before this lock the down layer (select the layer and click on the place where the lock button is above) so that other objects are not selected. Click right button and select Convert to Symbol >Movie Clip > Ok. After the task is done unlock the layer by clicking on the lock button of the layer.
Go to Filter window and click on Plus button and select the Glow effect. Set the Strength 250% and Blur 20%.
Select next frame (17) and click right button and click on Insert Blank Keyframe.
Take a keyframe (30) and do the same as in Step -4.
Now save the project. File > Save > Give a name > Ok.
Press Ctrl and Enter keys together to play the animation.
Tips: To remove the keyframe click right button and select Clear Keyframe and to remove the frames click right button and select Remove Frames.
If you feel any difficulty post your comment bellow.
Text Animation in Macromedia Flash 8
Macromedia Flash Professional 8 is a unique program with which we can make animations easily. If you have the experience of drawing in Photoshop you will learn how to make beautiful animations with this program. If you do not have don’t worry. I will show you how to make animations step by step.
Macromedia Flash Professional 8 gives more user friendly interface and easily understandable tools. Let’s begin.
Step -1. Click Start > All Programs > Macromedia Flash Professional 8.
Then the program will start within a few seconds.
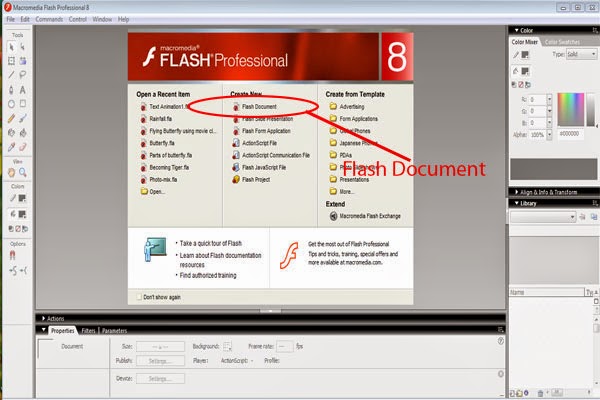 |
Macromedia Flash 8 program. |
Step – 2. Click Flash Document.
The stage will appear now.
 |
| Stage of the Flash Document |
 |
| Tool Box of the Macromedia Flash |
Now we will learn about some tools that we will use. Picture no 1 is Selection Tool, 2 is Sub Selection Tool, 3 is Free Transform Tool, 4 Gradient Tool, 5 Text Tool, 6 Rectangle Tool, 7 Paint Bucket Tool, 8 Color Selection Tool.
Step – 3. Select Text Tool from tool box and draw a text box by dragging the mouse pointer. Write the text, for example “Macromedia Flash Professional 8".
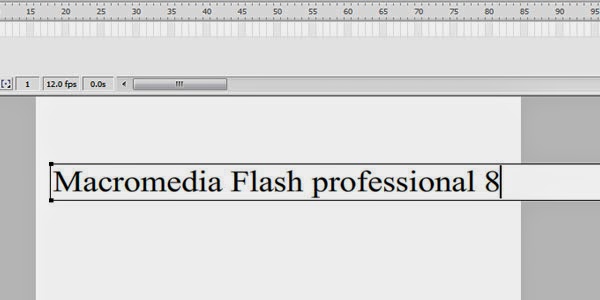 |
| Writing text with the help of Text Tool |
Step – 4. Create a new layer by clicking on the New Layer button. Select Rectangle Tool and select a gradient color.
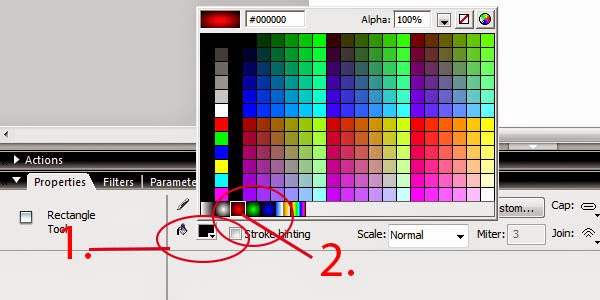 |
| Select a gradient color |
To select a gradient color click on color selection box(No 1); then see the gradient color in the bellow line (No 2). Now draw a rectangle over the text. The shape should be drawn to cover the text.
Step – 5. Select the Free Transform Tool and click on the shape. Then select the Gradient Tool. Click on the shape. Gradient point handler will appear. Make a suitable size by dragging. Now keep the gradient color in the middle of the shape.
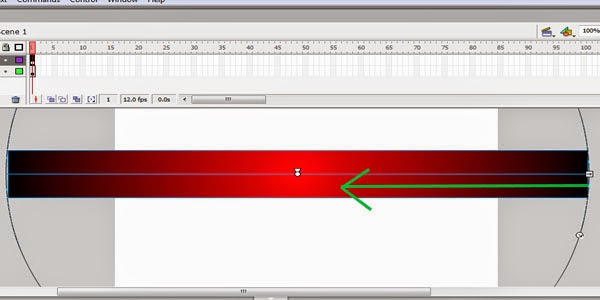 |
| Rsize the Gradient Color |
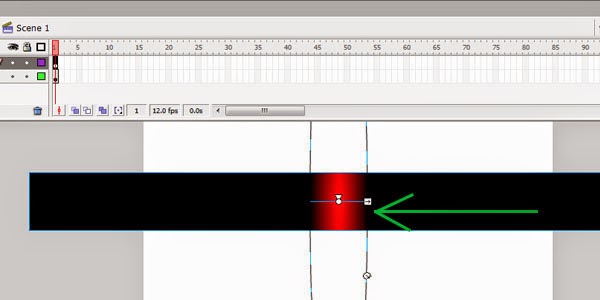 |
| Gradient Shape Resize 2 |
Step – 6. Keep the gradient at the start of the text and select frame no 30 from the Layer 2. Click right button and select Insert Keyframe. Select some frames from layer 2 and Right click > Create Motion Tween. Select the last 30 no frame and move the shape by dragging so that the gradient color remains at the end of the text.
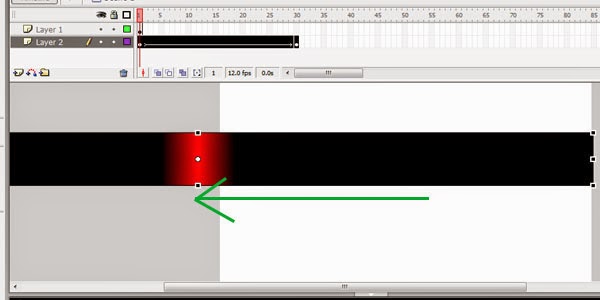 |
| Shape Gradient Placement at the start of the text |
 |
| Shape Gradient Placement at the end of the text |
Step – 7. Drag the Layer 2 under Layer 1. Select the frame no 30 from the Layer 1 and insert Keyframe. Right click on the Layer 1 and select Mask.
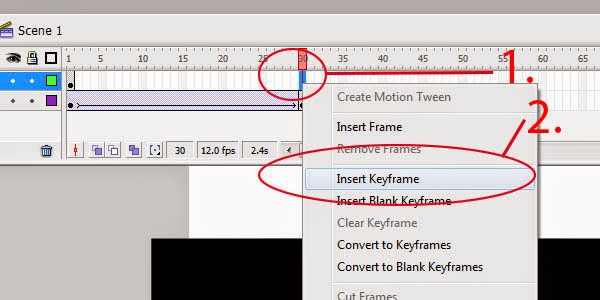 |
| Insert KeyFrame |
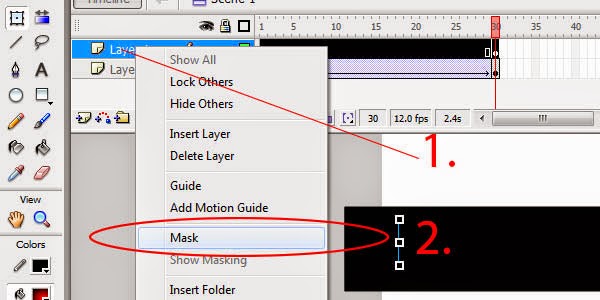 |
| Apply Mask |
Step- 8. Create a new layer. Select the Rectangle Tool and Click and hold the left mouse button for some time. Then select the Polystar tool. Click on Options from the Properties window bellow and choose the the style ‘Star’. Set the number of the sides ‘5’ and click Ok.
Draw 2 or 3 stars in the first keyframe. In the 2nd frame take a blank keyframe (Right click > Insert Blank Keyframe). Again draw the stars with diffrerent colors in different places.
Again take blankframes and draw the stars till the last frames.
Now press control and enter key together to play the animation.
Finally save the the project from File menu > Save.
If you think that you have got benefit from this article please share this.
Subscribe to:
Posts
(
Atom
)



No comments :
Post a Comment